Oliver Smith
on 7 July 2022
Bring home the disco with these Raspberry Pi HAT tutorials (Part 1)

Ubuntu is lighting up the Raspberry Pi this week with the first of a two-part collection of Unicorn HAT tutorials from our resident Pi developers, Dave ‘waveform’ Jones and William ‘jawn-smith’ Wilson. Part 2 can be found here.
In part 1 we start with a couple of simple Unicorn pHAT projects for those just getting started. This is followed by a more advanced case study from Dave on how to set up a dashboard for his exciting piwheels project using the Unicorn HAT.
This is a guest post from William’s blog, which he’s kindly allowed us to share here. Check out his site for more great Pi tutorials as well as some equally colorful 3D printing projects.
As of Ubuntu 22.04, the Pimoroni Unicorn hats are supported on Ubuntu out of the box. This includes the standard Unicorn Hat, Unicorn pHAT, Unicorn HAT Mini, and Unicorn HAT HD.
To install the libraries for each HAT, run the following commands:
sudo apt install python3-unicornhat
sudo apt install python3-unicornhathd
sudo apt install python3-unicornhatmini
Below are some examples of how to use them!
Tutorial: Learn the basics with the Unicorn pHAT
Section written by William Wilson
Note: sudo is required for all pHAT scripts
The pHAT is the perfect size to use on a Raspberry Pi Zero 2 and uses the same library as the Unicorn HAT.
The following script will display the Ukrainian flag:
import unicornhat as uh

uh.set_layout(uh.AUTO)
uh.brightness(0.5)

width,height=uh.get_shape()

for y in range(height):
    for x in range(width):
        if x < 2:
            uh.set_pixel(x, y, 0, 87, 183)
        else:
            uh.set_pixel(x, y, 255, 221, 0)

uh.show()
while True:
    pass

This next example periodically checks your internet speed and uses the pHAT to indicate if the speed is good or bad, using color (green, yellow or red) as an indicator. It requires the speedtest python module, which isn’t packaged natively in Ubuntu.
To install it, run: sudo pip3 install speedtest-cli
Then use the following script to create your mini-dashboard.
import unicornhat as uh
import speedtest
import time

st = speedtest.Speedtest()
uh.set_layout(uh.AUTO)
uh.rotation(0)
uh.brightness(0.5)
width,height=uh.get_shape()

while True:
    # run a speed test for download speed
    dl = st.download()

    # run a speed test for upload speed
    ul = st.upload()

    # Set the Unicorn pHAT LEDs accordingly
    if dl > 30000000: # 30 Mb/s
        # set the LEDs to green!
        dleds = (0, 255, 0)
    elif dl > 15000000: # 15 Mb/s
        # set the LEDs to yellow
        dleds = (255, 255, 0)
    else: # below 15 Mb/s
        # set the LEDs to red
        dleds = (255, 0, 0)

    if ul > 30000000: # 30 Mb/s
        # set the LEDs to green!
        uleds = (0, 255, 0)
    elif ul > 15000000: # 15 Mb/s
        # set the LEDs to yellow
        uleds = (255, 255, 0)
    else: # below 15 Mb/s
        # set the LEDs to red
        uleds = (255, 0, 0)

    for y in range(height):
        for x in range(width):
            if x < 2:
                uh.set_pixel(x,y,uleds)
            else:
                uh.set_pixel(x,y,dleds)

    uh.show()

    # sleep 10 minutes
    time.sleep(600)

As you can see in the image above, my download speed was very good but my upload speed was not.
For more projects like this, Pimoroni has many more examples in their Unicorn HAT GitHub repository.
Case Study: Build a piwheels dashboard with the Unicorn HAT
Section written by Dave Jones
Note: sudo is required for all Unicorn Hat scripts
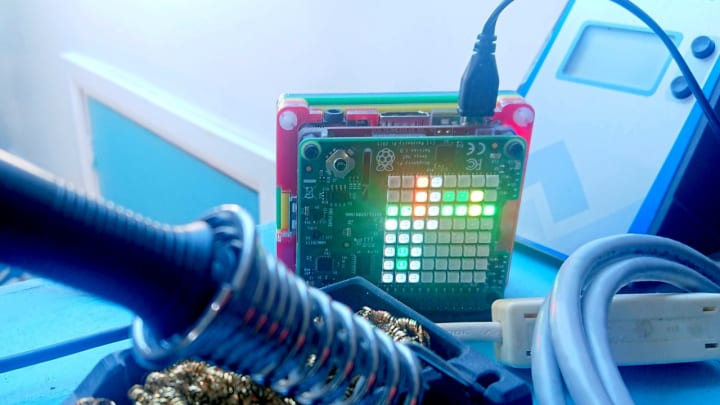
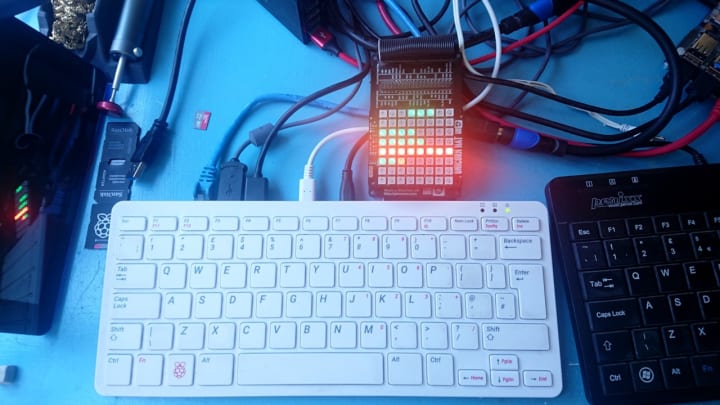
Anybody that’s been on a video call with me has generally noticed some neopixely thingy pulsing away quietly behind me. This is the Sense HAT-based piwheels monitor that lives on my desk (and occasionally travels with me).

For those unfamiliar with piwheels, the piwheels project is designed to automate the building of wheels from packages on PyPI for a set of pre-configured ABIs. In plain English, this means that piwheels contains pre-built packages rather than the source packages that would need to be built locally as part of the installation saving Pi users valuable time when installing new packages.
Piwheels currently only builds wheels for RaspiOS but we are currently exploring Ubuntu support in piwheels as well.
Why?
While a monitor comprised of 64 colored dots may seem minimal bordering on useless, I’ve found it quite the opposite for several reasons:
- It’s always visible on my desk; it’s always running (even when I’ve rebooted to Windows for some gaming), it’s never in a background window, it’s not an email alert that gets lost in spam, or a text message that I don’t notice because my phone’s on silent.
- It’s only visible on my desk; piwheels is a volunteer project, so I’m happy to keep things running when I’m at my desk. But if the builders go down at 4 in the morning, it’s not a big deal. I’ll handle that when I’m suitably caffeinated and behind my computer.
- It’s a constant view of the overall system; I can trigger alerts to fire when certain things fail or occur, but it’s also useful to have an “at a glance” view of the “health” of the overall system. I’ve occasionally caught issues in piwheels for which no specific alert existed because the monitor “looked off”.
How?
If anyone wants to follow in my pioneering lo-fi monitoring footsteps, here’s a little script to achieve something similar with a Unicorn HAT. We’ll go through it piece by piece:
#!/usr/bin/python3

import ssl
import math
import subprocess as sp
from pathlib import Path
from itertools import cycle
from time import sleep, time
from threading import Thread, Event
from urllib.request import urlopen, Request

import unicornhat
We start off with all the imports we’ll need. Nothing terribly remarkable here other than to note the only external dependency is the Unicorn HAT library. Now onto the main monitor function:
def monitor(layout):
    unicornhat.set_layout(unicornhat.AUTO)
    unicornhat.rotation(0)
    unicornhat.brightness(1.0)

    width, height = unicornhat.get_shape()
    assert len(layout) <= height
    assert all(len(row) <= width for row in layout)

    pulse = cycle(math.sin(math.pi * i / 30) for i in range(30))
    updates = UpdateThread(layout)
    updates.start()
    try:
        for p in pulse:
            colors = {
                None: (0, 0, 0),
                True: (0, 127, 0),
                False: (int(255 * p), 0, 0),
            }
            for y, row in enumerate(layout):
                for x, check in enumerate(row):
                    value = check.value if isinstance(check, Check) else check
                    unicornhat.set_pixel(x, y, colors.get(value, value))
            unicornhat.show()
            sleep(1/30)
    finally:
        unicornhat.clear()
        updates.stop()
        updates.join()
This accepts a single parameter, layout, which is a list of lists of checks. Each check corresponds to a single pixel on the HAT, so you can’t define more than 8 per row, and no more than 64 in total.
The function sets up:
- unicornhat – the Unicorn HAT, including rotation and brightness, and asserting that the layout will fit the “shape” of the HAT.
- pulse – an infinite cycle of numbers derived from the first half of a sine wave, which we’ll use to pulse the “failure” color nicely so it’ll draw some attention to itself.
- updates – some sort of UpdateThread which will be used to run the checks in the background so long running checks won’t get in way of us pulsing things smoothly.
Then it goes into an infinite loop (for p in pulse – remember that pulse is an infinite generator) constantly updating the HAT with the values of each check.
Note: You may note that check.value is only used when our check is actually a check, and further that if the value isn’t found in the colors lookup table, we just use the value directly. This allows us to specify literal False, True, or None values instead of checks (in case we want to space things out a bit), or have checks directly return color tuples instead of bools.
Now an important question: what is a check? Let’s define some:
def page(url, *, timeout=10, status=200, method='HEAD', **kwargs):
    context = ssl.create_default_context()
    req = Request(url, method=method, **kwargs)
    try:
        print(f'Requesting {url}')
        with urlopen(req, timeout=timeout, context=context) as resp:
            return resp.status == status
    except OSError:
        return False

def cmd(cmdline, shell=True):
    try:
        print(f'Running {cmdline}')
        sp.check_call(
            cmdline, stdout=sp.DEVNULL, stderr=sp.DEVNULL, shell=shell)
    except sp.CalledProcessError:
        return False
    else:
        return True

def file(filename, min_size=1):
    try:
        print(f'Checking {filename}')
        return Path(filename).stat().st_size > min_size
    except OSError:
        return False
We define three check functions:
- page – checks that accessing a particular url (with the “HEAD” method by default) returns status code 200 (OK in HTTP parlance).
- cmd – checks that executing a particular shell command is successful (exits with code 0).
- file – checks that the specified file exists and has a particular minimum size (defaults to 1 so this effectively checks the file is not empty).
Next, we define a class which we’ll use to define individual checks. It will wrap one of the functions above, the parameters we want to pass to it, and how long we should cache results for before allowing the check to be run again:
class Check:
    def __init__(self, func, *args, every=60, **kwargs):
        self.func = func
        self.args = args
        self.kwargs = kwargs
        self.every = every
        self.last_run = None
        self.value = None

    def update(self):
        now = time()
        if self.last_run is None or self.last_run + self.every < now:
            self.last_run = now
            self.value = self.func(*self.args, **self.kwargs)
Next, we need the background thread that will loop round running the update method of all the checks in the layout:
class UpdateThread(Thread):
    def __init__(self, layout):
        super().__init__(target=self.update, args=(layout,), daemon=True)
        self._done = Event()

    def stop(self):
        self._done.set()

    def update(self, layout):
        while not self._done.wait(1):
            for row in layout:
                for check in row:
                    if isinstance(check, Check):
                        check.update()
Finally, we need to run the main monitor function and define all the checks we want to execute. I’ve included some examples which check some common / important pages on the piwheels site, some pages on my blog server, some basic connectivity checks (can ping the local gateway, can ping a DNS name, can ping Google’s DNS), and some example file checks.
if __name__ == '__main__':
    monitor([
        [ # some connectivity tests, centered
            None,
            None,
            None,
            Check(cmd, 'ping -c 1 -W 1 192.168.0.1', every=5),
            Check(cmd, 'ping -c 1 -W 1 8.8.8.8', every=30),
            Check(cmd, 'ping -c 1 -W 1 ubuntu.com', every=30),
        ],
        [ # a blank row
        ],
        [ # check some piwheels pages
            Check(page, 'https://www.piwheels.org/'),
            Check(page, 'https://www.piwheels.org/packages.html'),
            Check(page, 'https://www.piwheels.org/simple/index.html'),
            Check(page, 'https://www.piwheels.org/simple/numpy/index.html'),
        ],
        [ # make sure Dave's little pi blog is running
            Check(page, 'https://waldorf.waveform.org.uk/'),
            Check(page, 'https://waldorf.waveform.org.uk/pages/about.html'),
            Check(page, 'https://waldorf.waveform.org.uk/archives.html'),
            Check(page, 'https://waldorf.waveform.org.uk/tags.html'),
            Check(page, 'https://waldorf.waveform.org.uk/2020/package-configuration.html'),
        ],
        [ # a coloured line
         (255, 127, 0)
        ] * 8,
        [ # are our backups working?
            Check(file, '/var/backups/dpkg.status.0'),
            Check(file, '/var/backups/apt.extended_states.0'),
            Check(file, '/tmp/foo', every=5),
        ],
    ])
You can run the full script like so:
$ sudo ./monitor.py
Press Ctrl+C to exit the script.
The last file check is for /tmp/foo, which probably doesn’t exist. So when you run this script you should see at least one blinking red “failure”. Try running echo foo > /tmp/foo and watch the failure turn green after 5 seconds. Then rm /tmp/foo and watch it turn back to blinking red.
If you wish to run the script automatically on boot, place this service definition in /etc/systemd/system/unicorn-monitor.service (this assumes you’ve saved the script under /usr/local/bin/monitor.py):
[Unit]
Description=Unicorn HAT based monitor
After=local-fs.target network.target

[Service]
Type=simple
Restart=on-failure
ExecStart=/usr/bin/python3 /usr/local/bin/monitor.py

[Install]
WantedBy=multi-user.target
Then run the following and you should find that the monitor will start automatically on the next reboot:
$ sudo systemctl daemon-reload
$ sudo systemctl enable unicorn-monitor
Enjoy!
And that’s all from William and Dave for this week, check back soon for part 2 where they take us through how to build a system monitor using the Unicorn HAT HD as well as a playable game of micro-Pong on the Unicorn HAT Mini!
If these ideas have sparked the imagination, don’t forget you can share your projects in the Raspberry Pi category on the Ubuntu Discourse!
For tips on getting started with the Raspberry Pi, as well as further project ideas, check out some of the links below.
Tutorials
- Install Ubuntu Desktop on the Raspberry Pi 4 (2GB and above)
- How to install Ubuntu Server on your Raspberry Pi
- How to install Ubuntu Core on your Raspberry Pi


